Thursday, December 16, 2010

Other Christmas Cookies

Today was cookie making day at our house. The biggest girl helped add the ingredients to the mixer while the littlest girl screamed in protest that she was not able to eat the dough or even reach the mixer. We had fun to say the least.

We made three different kinds of cookies...all types that I have never made before for Christmas, two of which I have never made at all before. They have all been tasted and passed with flying colors!

The first cookie we made was the Homemade Oreos which you can find at Smitten Kitchen and my tips in this post.
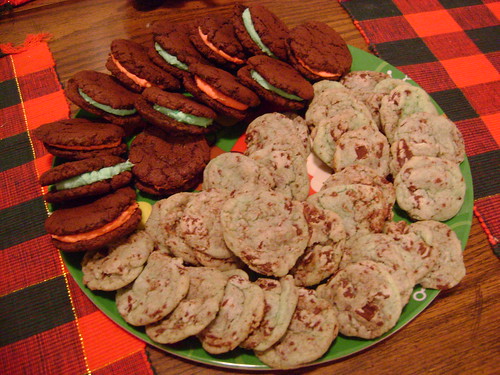
Cookie Day
The other two I found in my current issue of Ladies Home Journal. (I have no idea how I got a subscription to. It comes in my name but I never paid for one. It is not a magazine I would generally look at but it's free and it comes to my mailbox.)

Mint Chocolate Chip Cookies (found on a Betty Crocker advertisement in the magazine)
1 pouch or box of sugar cookie mix
1/2 c. butter, softened
1/2 t. mint extract
6-8 drops green food coloring
1 egg
1 c. creme de menthe baking chips (***see note below)
1. c. semisweet chocolate chunks

Mix cookie mix, butter, extract, food coloring and egg in bowl, until soft dough forms. Stir in creme de menthe baking chips and chocolate chunks. Using small cookie scoop or teaspoon, drop dough 2 inches apart on ungreased cookie sheet. Bake at 350 degrees for 8 to 10 minutes. Cool 3 minutes; remove from cookie sheets to wire rack. Serve warm or cool completely. Makes 36 cookies.

***I could not find creme de menthe baking chips so I bough a box of Andes chocolate mints, unwrapped them (with the help of two beautiful little girls), and chopped them up.

White Chocolate Thumbprints
2 2/3 c. flour
1 t. salt
1 c. butter, softened
1 c. sugar
1 large egg
1 t. vanilla extract
9 oz. white chocolate, chopped

Heat oven to 350 degrees. Whisk together flour and salt. In another bowl beat butter and sugar with an electric mixer on medium high until fluffy, about 4 min. then beat in egg and vanilla. On low speed, stir in flour mixture. Wrap dough in plastic wrap and chill until firm, about 1 1/2 hours. Roll 1 inch balls of dough and place 1 inch apart on baking sheets. Flatten each ball slightly; using your finger or a round half teaspoon, make an indentation in the center of each. Bake cookies about 15 minutes until cooked through but not golden. Re-indent center if needed and cool on baking sheets. Melt chocolate in 15 second increments in the microwave, stirring between each pass until just melted, 1 - 2 minutes total. Spoon white chocolate into cookie indents. Let set about 1 hour. Makes 5 1/2 dozen.

***I also sprinkled green and red sugar on the white chocolate before it set. They look really pretty with that.

Cookie Day
So...go bake! YUM!

Homemade Oreos

That title alone should have you drooling! I stumbled on a recipe for Homemade Oreos from Smitten Kitchen a couple of months ago and knew they would be made some point at Christmas. They have now been made twice. I made a batch for my mom's group cookie exchange and have a batch ready to be filled on the counter.

They are delicious! I do not get as many cookies as the recipe says it will yield. I actually only get like half so hers must be much smaller. I LOVE using my mini ice cream scoop for cookie dough so it must not be small enough. She also says to use your fingers to flatten the cookie, I dipped a glass with a flat bottom in warm water and flattened them. I thought that worked much better.

Also follow the recipes directions! When I made them the first time I creamed my butter and sugar then added the dry ingredients like I was taught to without paying attention the actual recipe until after I was done. This time I followed the directions and they turned out a little different, probably how they are supposed to turn out.

The filling is super, super thick and sweet. When I make it today, I'm going to add a little milk to the mixture. Last time I also did the peppermint extract in place of the vanilla which I will do again because peppermint screams Christmas! Then I divided the frosting in half and made half green and half red. They were so cute!

You definitely need to try these!

Tuesday, December 14, 2010

Brunch Treats

Today was one of my mom's group's Christmas craft workshop. We got to sit around, eat yummy food and make some really fun things all while our children were in the care of some awesome people. BLISS!!!! I had signed up to bring something for the amazing food spread. I wanted to share with you what I made because both items were oh so yummy!

I had put my name under "Egg Casserole" when I signed up and I wanted to make something a little different from the normal breakfast casserole. After scouring Pioneer Woman's breakfast recipes, I came across Eggs Florentine Casserole. It was scrumptious and different from the norm. It makes a 9 x 13" dish of casserole and I came home with two tiny corner pieces left. That's always a good sign.

I used frozen hasbrowns...DO NOT TELL PIONEER WOMAN! It's just so much easier than grating potatoes and it tasted good anyways. I also used a 1 lb. package of breakfast sausage and fried it up while crumbling it.

I absolutely LOVE Martha Stewart's Everyday Food Magazine. It is my favorite recipe magazine. I always learn something and find recipes that I want to make. I treated myself to buying the December issue since I usually just check it out at the library. I found another recipe that I wanted to make to take to my mom's group also.

Sausage-Cheddar Balls
45 sausage balls

1 1/4 cup all-purpose flour
1/2 teaspoon coarse salt
1/4 teaspoon ground pepper
1/2 teaspoon cayenne pepper
1 1/2 teaspoon baking powder
2 cups grated cheddar
1 lb bulk breakfast sausage
1/2 large yellow onion, grated on large holes of a box grater
3 tablespoons unsalted butter, melted

Directions

1. Preheat oven to 400 degrees. Line a baking sheet with parchment paper.

2. In a large bowl, whisk together flour, salt, ground pepper, cayenne pepper and baking powder. Add grated cheddar and toss to coat. Add sausage, grated onion and melted butter.

3. With your hands, mix until well blended and roll mixture into 1-inch balls. Place balls, 1/2 inch apart, on baking sheet. Bake until balls are golden and cooked through about 25 minutes. Serve warm.

***I chopped my onion finely instead of grating it but next time might grate it to get even smaller pieces. I would also use just a little bit less of the cayenne. They had a good kick to them but were still so very yummy!

Sunday, December 12, 2010

Pillowcase Dresses

I have been in love with pillowcase dresses for a long time. I have a beautiful vintage pillowcase just waiting to be made into a summer dress for my oldest daughter. Alas I kept procrastinating and/or forgetting. The other day I was in JoAnne's and decided my girls needed matching Christmas pillowcase dresses and it was time for me to do it! So I picked out some fabric. It wasn't exactly what I wanted but it works and they turned out cute.
Christmas Sisters
I used the tutorial found HERE on Naptime Crafts. I added a trim to the bottom of their dresses to set them off. Between the main dress fabric and the trim fabric I sewed on a red pom-pom trim which really added to the dresses, I think.

I am happy with how they turned out. I especially LOVE seeing my girls in something I made for them. Obviously since it is winter and blustery out we added the red leggings and white turtlenecks.

Friday, December 10, 2010

Felted Sweater Garland

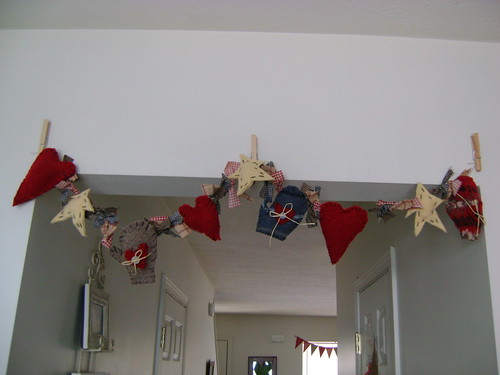
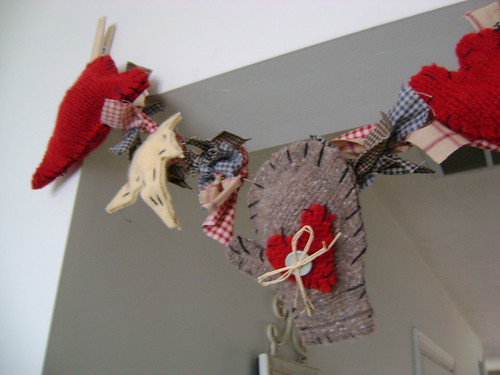
A few weeks ago I was able to get together with a really sweet friend who loves to make crafts. She had a really sweet project started that we got to finish together. (A friend, a craft, yummy food, awesome conversation and lots of laughs equates bliss.) She had bought some wool sweaters and felted them. (Washing in hot water and drying.) Then she cut out mitten, heart, and star shapes and glued matching sweater pairs together with fabric glue except for one small hole where she stuffed the shapes with stuffing.
Christmas Garland
This was what she had done already. Then together we stitched all the way around the edges with black embroidery thread. We stitched some small hearts onto some of the shapes and added button and rafia. To finish we strung all of our shapes onto twine to make a garland. At home I tied on strips of Homespun fabric for a finishing touch. The garland is hanging in my kitchen entry. I love how it turned out.
Christmas Garland
To give it a homey look I used clothespins to hang it. I attached those sticky removable strips to the clothespins and tied the twine to the two end clothespins then hung it from the wall.

Cranberry Pork

I discovered this recipe on a Facebook friend's page and have made it several times since. We LOVE it. It is probably our family favorite right now.

Cranberry Pork Roast
1 (3 lb.) boneless pork loin roast, trimmed ***See note below
2 cans jellied whole-berry cranberry sauce
1/2 c. steak sauce
2 T. brown sugar
2 t. prepared mustard
4 T. water
4 T. cornstarch

Coat a large nonstick skillet with cooking spray; place over medium high heat. Add roast; cook until browned on all sides. Place roast in 4-5 qt. electric slow cooker coated with cooking spray. Combine cranberry sauce, steak sauce, brown sugar, and mustard; pour over roast. Cover and cook on low heat for 8 hours or high heat 4-5 hours. Remove roast from sauce, cover and keep warm. Combine water and cornstarch, stirring until smooth. Slowly stir cornstarch mixture into sauce in slow cooker. Pour mixture (very carefully) into a 1 quart microwave safe glass dish. Microwave at high heat for 2 minutes, stirring after one minute. Serve roast with cranberry sauce.

***I have been using pork loin chops instead of the roast because they have been on sale and they were wonderfully in the recipe. I also never have steak sauce so I just mix up some ketchup and Worcestershire sauce to make a 1/2 cup mixture.

You really need to make this. It is so easy and the flavor is AMAZING! It is really good served with a side of couscous and a vegetable like sauteed spinach with fresh mushrooms, onions and balsamic vinegar.

A Little Sweet Treat

This past Wednesday we had a couple friends over to decorate cookies. I wanted to make a little snack for us and wanted it to be easy after making bunches of sugar cookies. I found this little gem in my recipe box and decided to finally try it. Super easy, super good!

Honey Cream Filled Crescents
4 oz. cream cheese, softened
3 T. honey
1/4 c. sliced almonds
1 pkg. crescent roll

Preheat oven to 375 degrees. Mix cream cheese and 2 T. honey; stir in almonds. Unroll crescent roll dough; separate into 8 triangles. Spread 1 rounded T. of the cream cheese mixture onto each triangle; roll each up loosely. Place rolls on ungreased baking sheet; curve each into crescent shape. Sprinkle with cinnamon. Bake 12-14 minutes or until golden brown. Serve rolls warm, drizzled with remaining honey.